도메인 발급 구매하기
- Freenom 무료도메인을 12개월 사용가능하다.
- 오류가 있어서 원하는 사이트명을 확인하고 무료 도메인의 주소를 정확히 입력하면 할 수 있다.
- 예 : aaa -> aaa.tk
- .tk는 보통 .com, .kr 등과 같은 도메인이다.
https://www.freenom.com/en/index.html?lang=en
Freenom - A Name for Everyone
Cost Price Free Special
www.freenom.com
넷플리파이에 적용하기
- 프로젝트등록
- 프로젝트파일을 Deploys에 끌어다 놓으면 사이트가 업로드된다.
- 도메인 셋팅

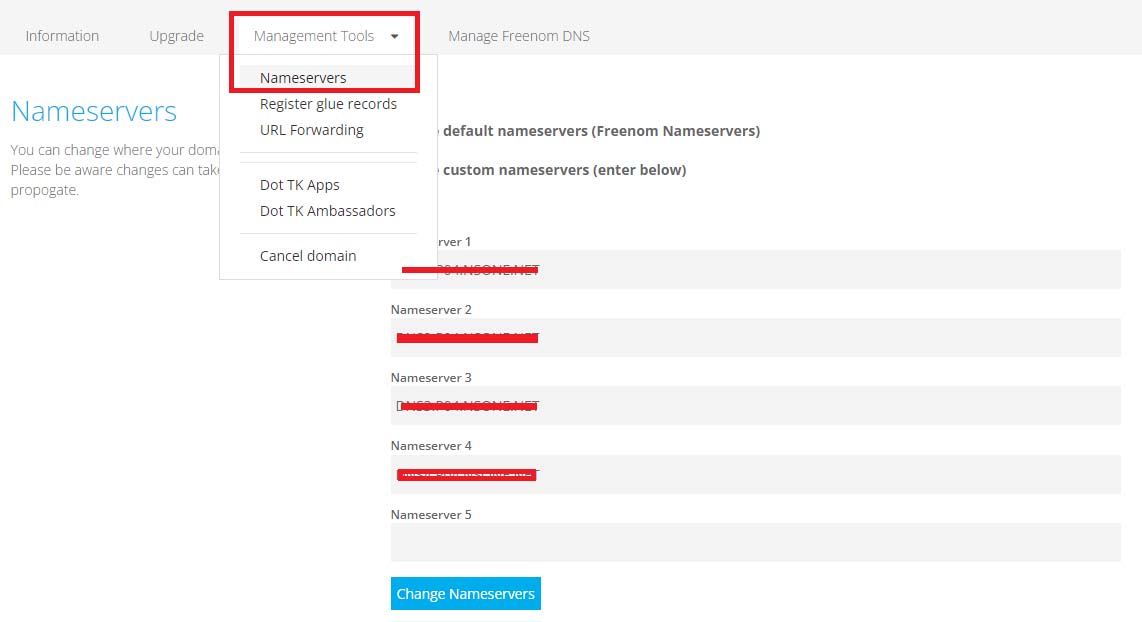
- 도메인 구매한 사이트에서 네임서버를 넷틀리파이의 네임서버로 변경.
- 관리 권한을 넘기는 과정
- 사이트 도메인 등록

- 위와 같이 녹색이 뜬다면 정상적으로 적용된것임.
파비콘 적용하기
- 이미지를 준비한다.
- 이미지 파비콘 변환 사이트
https://www.favicon-generator.org/
Favicon & App Icon Generator
Upload an image (PNG to ICO, JPG to ICO, GIF to ICO) and convert it to a Windows favicon (.ico) and App Icons. Learn more about favicons.
www.favicon-generator.org
- index.html과 같은 경로에 .ico 파일을 두고 Deploys하고 확인한다.
- 제대로 적용되지 않는다면 F12개발자도구를 킨 상태로 새로고침을 오른쪽클릭하고 강력 새로고침을 하여 캐시를 새로 받아주면 적용된 것을 볼수 있다.
- .ico파일을 적용하기위해 html파일 헤드 부분에 아래 코드를 넣어주어야한다.
<link rel="shortcut icon" href="/favicon.ico" type="image/x-icon">
<link rel="icon" href="/favicon.ico" type="image/x-icon">
막간 추천 사이트
- 생활코딩 서말(개발 공부 로드맵)
Seomal - 서말
seomal.com
- sayhello 개발자용 검색사이트
Hello: Search Engine for Developers
beta.sayhello.so
검색엔진에 내 사이트 등록
네이버 서치어드바이져
- 웹마스터 도구 - URL입력 - 본인소유확인
- robots.txt 간단생성
https://searchadvisor.naver.com/
네이버 서치어드바이저
네이버 서치어드바이저와 함께 당신의 웹사이트를 성장시켜보세요
searchadvisor.naver.com
- sitemap 생성기
- 내 사이트주소 넣으면 사이트맵을 만들어준다.
Create your Google Sitemap Online - XML Sitemaps Generator
Installable version We offer a server-side script written in PHP language that you can install on your server and create sitemap for your website. The script doesn't have the limit on number of pages included in sitemap, although server resources required
www.xml-sitemaps.com
- robots.txt파일에 아래 코드를 넣어준다.
- 좀 더 봇이 내 사이트를 잘 찾도록 해준다.
Sitemap: http://www.(내 주소)/sitemap.xml- robots.txt, sitemap.xml 제출하기
구글 서치콘솔 등록
https://search.google.com/search-console
Google Search Console
Search Console 도구와 보고서를 사용하면 사이트의 검색 트래픽 및 실적을 측정하고, 문제를 해결하며, Google 검색결과에서 사이트가 돋보이게 할 수 있습니다.
search.google.com
- 사이트 - 속성 추가 - 사이트주소 등록 - 소유권확인
- 넷틀리파이 - 도메인 세팅 - 도메인스 - 옵션 - go to dns panel - add new record
- 서치콘솔에서 텍스트복사 - 넷틀리파이 add new record에 등록
- 사이트맵 추가
SEO 최적화
- 외부 : 역링크, 방문자 수, 기간 등
- 내부 : 시멘틱 마크업, 메타 태그 등
SEO Tools, Software and Articles | SEO Site Checkup
All of the tools right at your fingertips. With one quick click, you can see how your site is doing. The dashboard offers instant access to reports, monitors, and analysis tools.
seositecheckup.com
방문자 분석
- 구글 애널리틱스
https://analytics.google.com/analytics/web
Redirecting...
analytics.google.com
CSS
- 같은 HTML로 CSS만 달리한 다양한 페이지를 볼수 있다.
CSS Zen Garden: The Beauty of CSS Design
So What is This About? There is a continuing need to show the power of CSS. The Zen Garden aims to excite, inspire, and encourage participation. To begin, view some of the existing designs in the list. Clicking on any one will load the style sheet into thi
www.csszengarden.com
- .(닷)은 클래스를 의미. 적용대상이 여러개 일때 사용
<h1 class="red">사과</h1>
<h1 class="red">포도</h1>
.red{
color: red;
}- #은 id를 의미. 적용대상이 하나일때 사용한다.
<h1 id="apple">사과</h1>
<h1 id="grape">포도</h1>
#apple{
color: red;
}
#grape{
color: purple;
}CSS사용법
css 파일 연결
- style.css 파일 생성한 후 html 파일 헤드부분에 아래와 같은 코드를 작성한다.
<link rel="stylesheet" href="style.css">style 태그
- html 파일 헤드부분에 아래와 같은 방식으로 코드를 작성한다.
<style>
  h1{
    color: red;
}
</style>
inline style
- body내 태그에 아래와 같은 방식으로 코드를 작성한다.
<h1 style="color: red;">사과</h1>!important
- 남발금지. 뒤에 넣은 임폴턴트가 제일쌤
<style>
  h1{
    color: red !important;
}
</style>
CSS 적용순위
- !important
- inline style
- #id
- .class
- tag
태그의 종류
- block태그 - 해당줄 전체를 다 먹음
- 부모 - width(너비) 결정
- 자식 - height(높이) 결정
- inline태그 - 자신의 영역만큼만 먹는다.
구글 클론사이트 만들기
- 피그마
- 디자이너가 피그마를 사용하여 디자인하면 프론트엔드가 코드를 작성하는 식으로 작업한다.
Figma: the collaborative interface design tool.
Build better products as a team. Design, prototype, and gather feedback all in one place with Figma.
www.figma.com
- 조코딩 피그마
https://www.figma.com/file/JqallxcU95juqqA7CthlS9/joogle?node-id=0%3A1
Figma
Created with Figma
www.figma.com
- 플렉스
Flexbox Froggy
A game for learning CSS flexbox
flexboxfroggy.com
CSS 프레임워크
- 부트스트랩
Bootstrap
The most popular HTML, CSS, and JS library in the world.
getbootstrap.com
- 테일윈드
Tailwind CSS - Rapidly build modern websites without ever leaving your HTML.
Documentation for the Tailwind CSS framework.
tailwindcss.com
- 코드펜
CodePen
An online code editor, learning environment, and community for front-end web development using HTML, CSS and JavaScript code snippets, projects, and web applications.
codepen.io
- 폰트어썸
- 아이콘 등의 이미지를 코드로 받아 쓸수 있는 곳.
Font Awesome
The world’s most popular and easiest to use icon set just got an upgrade. More icons. More styles. More Options.
fontawesome.com
2주차 공부한 코드
- index.html
<!DOCTYPE html>
<html lang="kr">
<head>
    <meta charset="UTF-8">
    <meta http-equiv="X-UA-Compatible" content="IE=edge">
    <meta name="viewport" content="width=device-width, initial-scale=1.0">
    <title>젤리비 홈페이지</title>
    <!-- 파비콘 -->
    <link rel="shortcut icon" href="/favicon.ico" type="image/x-icon">
    <link rel="icon" href="/favicon.ico" type="image/x-icon">
    <!-- 구글애널리틱스 -->
    <!-- Global site tag (gtag.js) - Google Analytics -->
<script async src="https://www.googletagmanager.com/gtag/js?id=G-W7Y3GGNX5K"></script>
<script>
  window.dataLayer = window.dataLayer || [];
  function gtag(){dataLayer.push(arguments);}
  gtag('js', new Date());

  gtag('config', 'G-W7Y3GGNX5K');
</script>
<style>
  h1{
    text-align : center;
    margin-top: 232px;
    font-family: 'Roboto';
    font-style: normal;
    font-weight: 400;
    font-size: 90px;
    line-height: 105px;
    text-align: center;
    letter-spacing: -17px;
  }
  h1 span:nth-child(1){
    color: #4285F4;
  }
  h1 span:nth-child(2){
    color: #EA4335;
}
h1 span:nth-child(3){
  color: #FCC629;
}
h1 span:nth-child(4){
  color: #4285F4;
}
h1 span:nth-child(5){
  color: #34A853;
}
h1 span:nth-child(6){
  color: #EA4335;
}
h1 span:nth-child(7){
  color: purple;
}
h1 span:nth-child(8){
  color: yellow;
}
  input{
    display: block;
    margin: 0 auto;
    width: 616px;
    height: 46px;
    background: #FFFFFF;
    border: 1px solid #DFE1E5;
    border-radius: 24px;
  }
  .button-box{
    display: flex;
    justify-content: space-around;
    align-items: center;
    margin-top: 26px;
    width: 265px;
    margin: 0 auto;
    margin-top: 26px;
  }
  .button-box button:nth-child(1){
    width: 111px;
height: 36px;
font-family: 'Roboto';
font-style: normal;
font-weight: 400;
font-size: 14px;
line-height: 16px;
text-align: center;
color: #000000;
  }
  .button-box button:nth-child(2){
    width: 111px;
height: 36px;
font-family: 'Roboto';
font-style: normal;
font-weight: 400;
font-size: 14px;
line-height: 16px;
text-align: center;
color: #000000;
  }
</style>
</head>
<body>
    <h1>
      <span>J</span>
      <span>e</span>
      <span>l</span>
      <span>l</span>
      <span>y</span>
      <span>B</span>
      <span>e</span>
      <span>e</span>
    </h1>
    <form action="https://www.google.com/search" method="get">
      <input type="text" name="q">
      <div class="button-box">
        <button type="submit">JellyBee 검색</button>
      <button type="button" onclick="location.href='https://jellybee.tk/textarea.html'">I'm JellyBee</button>
      </div>
    </form>
</body>
</html>
- textarea.html
<!DOCTYPE html>
<html lang="en">
<head>
    <meta charset="UTF-8">
    <meta http-equiv="X-UA-Compatible" content="IE=edge">
    <meta name="viewport" content="width=device-width, initial-scale=1.0">
    <title>Document</title>
<!-- 부트스트랩 CSS적용 -->
    <link href="https://cdn.jsdelivr.net/npm/bootstrap@5.2.0/dist/css/bootstrap.min.css" rel="stylesheet" integrity="sha384-gH2yIJqKdNHPEq0n4Mqa/HGKIhSkIHeL5AyhkYV8i59U5AR6csBvApHHNl/vI1Bx" crossorigin="anonymous">
</head>
<body>
    <div class="container">
        <nav class="navbar navbar-expand-lg bg-light">
            <div class="container-fluid">
              <a class="navbar-brand" href="#">Navbar</a>
              <button class="navbar-toggler" type="button" data-bs-toggle="collapse" data-bs-target="#navbarSupportedContent" aria-controls="navbarSupportedContent" aria-expanded="false" aria-label="Toggle navigation">
                <span class="navbar-toggler-icon"></span>
              </button>
              <div class="collapse navbar-collapse" id="navbarSupportedContent">
                <ul class="navbar-nav me-auto mb-2 mb-lg-0">
                  <li class="nav-item">
                    <a class="nav-link active" aria-current="page" href="#">Home</a>
                  </li>
                  <li class="nav-item">
                    <a class="nav-link" href="#">Link</a>
                  </li>
                  <li class="nav-item dropdown">
                    <a class="nav-link dropdown-toggle" href="#" role="button" data-bs-toggle="dropdown" aria-expanded="false">
                      Dropdown
                    </a>
                    <ul class="dropdown-menu">
                      <li><a class="dropdown-item" href="#">Action</a></li>
                      <li><a class="dropdown-item" href="#">Another action</a></li>
                      <li><hr class="dropdown-divider"></li>
                      <li><a class="dropdown-item" href="#">Something else here</a></li>
                    </ul>
                  </li>
                  <li class="nav-item">
                    <a class="nav-link disabled">Disabled</a>
                  </li>
                </ul>
                <form class="d-flex" role="search">
                  <input class="form-control me-2" type="search" placeholder="Search" aria-label="Search">
                  <button class="btn btn-outline-success" type="submit">Search</button>
                </form>
              </div>
            </div>
          </nav>
        <div class="mb-3">
            <label for="exampleFormControlInput1" class="form-label">Email address</label>
            <input type="email" class="form-control" id="exampleFormControlInput1" placeholder="name@example.com">
          </div>
          <div class="mb-3">
            <label for="exampleFormControlTextarea1" class="form-label">Example textarea</label>
            <textarea class="form-control" id="exampleFormControlTextarea1" rows="3"></textarea>
          </div>
    <!-- 부트스트랩 js적용 -->
          <script src="https://cdn.jsdelivr.net/npm/bootstrap@5.2.0/dist/js/bootstrap.bundle.min.js" integrity="sha384-A3rJD856KowSb7dwlZdYEkO39Gagi7vIsF0jrRAoQmDKKtQBHUuLZ9AsSv4jD4Xa" crossorigin="anonymous"></script>
    </div>
    </body>
</html>
젤리비 홈페이지
J e l l y B e e
jellybee.tk
'Web' 카테고리의 다른 글
| [JS] 조코딩 5주차 강의 정리 (0) | 2022.08.20 |
|---|---|
| [JS] 조코딩 4주차 강의 (0) | 2022.08.13 |
| [JS] 조코딩 3주차 강의 (0) | 2022.08.06 |
| [HTML] 조코딩 1주차 강의 (0) | 2022.07.23 |
| [HTML] 나만의 프로필만들기-스파르타코딩클럽 (0) | 2022.07.22 |

댓글